Writing also requires knowing and using a large number of vocabulary words. Further, every content area has its own specialized words and concepts.
Yet, vocabulary instruction has not been a priority in many schools. Another challenge is that it has not been highly effective or engaging. When vocabulary instruction does occur, it tends to be rote memorization, which students and teachers have come to dread.
While teaching vocabulary can be a complex and challenging task, the payoff is well worth the effort: higher reading proficiency, better writing and stronger learning across a wide range of subjects. Following are some general principles to help guide teachers in developing or choosing a vocabulary curriculum.
Make vocabulary instruction integrative
New words and concepts are best learned (and taught) in relation to students’ existing and developing word knowledge. Teaching words that are related to one another allows students to make connections between words. Also, rather than teaching words in isolation, vocabulary instruction should be woven into what students are already reading and studying.
Make teachable moments out of interesting words encountered in authentic reading experiences.
Integrate vocabulary instruction into the content areas.
Connect vocabulary learning to a current event.
Involve active processing and discussion
A vocabulary program should offer plenty of ways to talk about words and engage in meaningful activity with words. This gets students thinking deeply about words.
Ask students to come up with synonyms or antonyms, then discuss how the specific words are similar and different.
Engage students in categorizing a set of words or do a cloze activity that provides opportunities to actively engage in word study and exploration.
Provide repeated exposure
To learn word meanings and use words correctly, students need repeated exposure in a variety of contexts and modalities. Moreover, those exposures should occur over a period of days and weeks rather than one or two days.
Give students opportunities to see words in various textual contexts: word walls, cloze sentences, word sorts, word mapping, word games, etc.
Ask parents and other school staff to use the words in their own interactions with students.
Focus on meaningful word parts
Effective vocabulary instruction takes advantage of morphology by helping students understand how words are made up of meaningful components: base words, prefixes, suffixes, and inflected endings.
For example, knowledge of morphology helps students understand that when bi- is used as the prefix the word may include the notion of two-ness, and that the prefix tri- means the word may have something to do with threes (e.g., tricycle, triangle).
Many base words in English are derived from Latin and Greek roots. Helping students detect the root in words and associate it with the original meaning can give them a productive approach for coming to the meaning of the word. For example, knowing that spect is a Latin root that means to see or observe, students can infer that the following words also address seeing or observing: spectacle, spectacular, spectator, inspect, inspection, retrospection, circumspection, etc.
Differentiate instruction and practice.
Digital tools can help in teaching words based on context clues and meaning, and make it easier to differentiate vocabulary instruction and practice. For example, using digital resources such as Vocabulary A-Z, teachers can choose from premade vocabulary lessons and word lists or create their own lessons, and then connect them to their current topics of study or popular reading series.
Assign differentiated lessons to students for online independent practice.
Use digital reports to monitor student needs and inform instruction for individuals or the whole class.
Make it game-like
From Scrabble to Balderdash, adults play a variety of word games. Creating opportunities for students to play heightens their attention to and appreciation of word study.
Make games a regular event in a vocabulary-rich classroom, rather than playing only after students’ work is done.
Use online and mobile game-based activities to motivate students and extend their learning outside of the classroom.
Take control
Most of all, teachers should have some degree of ownership over how vocabulary is taught. They should have control over the words taught and the methods used to teach those words. Simply following an existing scripted vocabulary program denies teachers and students the opportunity to make words their own.
Make vocabulary a priority
To help all students become proficient readers and writers, and learn important content, we cannot overlook vocabulary. Now is the time for teachers at all grade levels to dedicate themselves to making vocabulary an instructional priority.
Timothy Rasinski, Ph.D, is a professor of literacy education at Kent State University and director of its award-winning reading clinic. He also holds the Rebecca Tolle and Burton W. Gorman Endowed Chair in Educational Leadership. Tim has written more than 200 articles and has authored, co-authored, or edited 50 books or curriculum programs on reading education. Tim is past-president of the College Reading Association, which also awarded him the A. B. Herr and Laureate Awards for his scholarly contributions to literacy education. In 2010, Tim was elected to the International Reading Hall of Fame. Follow him on Twitter @TimRasinski1.
Teaching at our best is like anything else we pursue; it’s part science and part art. It’s a learned skill that requires time and patience to hone. Teachers, therefore, become frustrated when our self-efficacy is threatened by questionable policies and relentless new initiatives, particularly during a pandemic. But having a set of trusted pedagogical strategies can help us keep it together—even under extreme pressure.
In coaching schools, part of the initial work is to engage leadership in learning walks to see what’s happening in classrooms before investing time and resources to design professional development (PD). Classrooms will always be the incubator for what’s needed in education.
It’s challenging for administrators to keep their fingers on the pulse of what’s happening in their schools if they’re not interacting with teachers in classrooms or listening to them. These visits also allow school leaders to recommend appropriate tools and practices for empowering teachers.
Start of newsletter promotion.
Subscribe to Edutopia Weekly
Get our essential newsletter featuring must-read articles on the education topics that matter to you—it’s personalized and delivered every Wednesday.
Through no fault of their own, I have found that many classroom teachers don’t always see how assessment drives instruction or the alignment between summative assessment, learning goals, formative assessment, and teaching strategies/scaffolds. For example, a career switcher who didn’t participate in a preservice program or a teacher whose preservice program included very little instructional modeling may not have a set of pedagogical strategies at their disposal for planning and facilitating instruction.
There isn’t only one way to teach. But daily lessons must have flow and alignment.
Classroom teachers need to have fluidity and a reservoir of trusted strategies they know when to use. These strategies must be part of methods for attacking daily instructional problems with flexibility to address unforeseen occurrences. A planning tool and framework for mapping instruction backward can be helpful in maintaining alignment no matter what we encounter in the instructional day.
To help support teachers, I’ve adapted the tool during lesson/project ideation sessions. It’s been helpful for teachers who may not understand how to rewrite standards into learning goals or for those who may need a refresher on scaffolding and creating instructional alignment. Some of the schools I work with have even added the tool into their lesson and performance task templates. See a template and completed example here.
The tool originates from PBLWorks and is inspired by backward design methodology by Jay McTighe and Grant Wiggins but does not replace McTighe’s Understanding by Design resources through ASCD. Instead, the tool is a simple table with four columns, easily allowing educators to map their instruction in alignment with summative assessment and daily learning goals.
ALIGNING INSTRUCTION IN 4 STEPS
Column one: Determine summative assessment. Well-designed summative assessments drive instruction when they align to standard(s) or a benchmark. The tool should be used to align instruction for summative assessments in the form of products, demonstration of a performance task(s), or literary composition.
For example, a particular unit or project plan can call students to create written, technology-based, or constructed products (e.g., reports, PSAs, model prototypes, etc.). Once we determine what we want our kids to do and make by the end of a specified time, that goes into column one.
Column two: Compose learning goals. Developing learning goals for lessons and projects is a critical practice often neglected in PD and, therefore, is often excluded or not well thought out in curriculum unit design. Derived from academic standards and learning frameworks, learning goals are vital to teaching and observing learning and are the backbone of lessons.
Good learning goals drive what students will understand and what they will be able to accomplish following a lesson or project. They need to go beyond objectives on our whiteboard or lesson plan and should be unpacked during mini-lessons as the focal point of the academic conversation between teachers and students.
I use learning targets (LTs) to capture learning goals as statements about what students can do regarding completing the product or task in column one of the planning tool. Here are some examples of what can go in column two:
I can explain how human activity affects the health of bodies of water and the ecosystems they support.
I can collect and analyze data to inform my decisions and design better solutions to real-world problems.
I can present my conclusions to an audience using multimedia tools that more effectively convey my message.
Column three: Develop formative assessments. Each learning goal in column two will need formative assessment to check students’ understanding. Teachers can decide on both informal and formal formative assessments. I find conducting two formal checks (quizzes, essays, etc.) for each summative assessment good practice for determining where students need help, remediation, and challenge.
Informal checks can be used daily between our interactions with students to determine their instructional needs. Here are some we can use as quick checks for understanding.
Column four: Utilize instructional strategies and scaffolds.Instructional strategies and scaffolds are what we reach for to teach a particular lesson—or, in this case, the learning goal(s) in column two. Learning goals require us to explain, clarify, and model. Regardless, students will need time to practice—moving from guided (teacher-led) to independent.
Gleaning insights from formative assessment helps us put the appropriate scaffolds and interventions in place by updating column four. For example, to help students with their coding skills, I like using the workshop model to structure station rotations allowing them to move between working independently and working with the teacher or their peers. Both content and elective teachers can also use it for differentiating and choosing scaffolds that work best for their kids.
As a first-grade teacher, I thought I knew how to teach reading—I’ve even received accolades for my pedagogy. During guided reading I would pull small groups of kids based on ability, spending 15–20 minutes with each. We would read through our story of the week by taking a picture walk to help us understand the story. If students were stuck on a word, I would cue them to sound it out and look at the picture.
It wasn’t until I started to dig deeper into the science behind how people learn to read that I began to reflect on how I had been teaching reading in my classroom. Reading is not a natural process, but one that must be taught explicitly and systematically. Further, as Natalie Wexler discusses in The Knowledge Gap, reading is a human right: Teaching all students to read is an issue of both equity and social justice.
I realized that a shift in my practice was vital if I wanted to reach all of my students—and this is how I made that shift.
Start of newsletter promotion.
Keep Up With Education Research
Staying on top of important discoveries in the learning sciences field has never been easier. Discover our new monthly newsletter, The Research Is In.
Daily phonemic awareness: Phonemic awareness, the ability to identify and manipulate individual sounds in spoken language, is crucial in the development of early readers. I began spending around 10 minutes a day with the whole group explicitly focusing on individual phonemes in words. Some of the oral activities we engaged in were segmenting (say the sounds in cat), identifying (where do you hear /a/ in the word cat?), substituting (change /c/ to /p/ in the word cat—what do you get?), deleting (say cat without /c/—what is left?), and adding (add /s/ to cat). Hand movements were incorporated during these activities. For example, swing your bat to blend /s//t//o//p/.
This approach is multisensory, fast-paced, and engaging. During small groups, I incorporated visual activities that supported phonemic awareness, such as word ladders for manipulating phonemes, elkonin boxes, magnetic chips and wands for segmenting sounds in words, and Slinkys for segmenting and blending individual phonemes in words. For instance, students would hold a Slinky in their hands and then pull it out for each individual sound, closing it again to blend sounds together and to say the whole word.
Application, application, application: I began scrutinizing my time spent on learning. I was so surprised at how little time my kids had to practice the skills introduced. I adopted an “I Do, We Do, You Do” gradual release structure. Every student needed the opportunity to hear, say, read, and spell.
Using that model, I realized that traditional centers such as independent reading and word work needed to be revamped. For example, rather than having kids choose books at random, I had them read the phonics passages we had been reading during small groups. The kids felt successful because the passages were familiar. I also saw an increase in fluency and accuracy scores on my Dynamic Indicators of Basic Early Literacy Skills (DIBELS) assessments, which we use to monitor early literacy skills. For word work, I had students work with sounds in words, either by manipulating phonemes through word ladders or by sorting by the number of phonemes in a word.
As students developed phonemic awareness, opportunities for application popped up everywhere. For example, a student named Charlie questioned why his name was alphabetized under C, with come and Carly, but it said /ch/. This made so much sense to me. For kids to truly understand the sound (phoneme) letter (grapheme) relation, words should be sorted by sound. I replaced my alphabetical word wall with a sound wall and never looked back. Now when I introduce sounds, we discuss articulation and our tongue and lip placement. The sound wall is a focal point in our room that supports kids as they are learning their sounds.
Mindfully choosing what students read: Students need material that contains words, sentences, and paragraphs that they can actually read. I became more intentional in the reading material I provided my kids. I began using decodable texts. These are books that follow a progression of phonics patterns. I tried my best to find books and/or passages that matched the skill(s) I had introduced. I saw my kids’ confidence increase because they were successful at reading. For a teacher, this is the best feeling.
At the same time, representation matters. Kids need to see themselves in the materials being used in the classroom to develop deep connections. For me, I gave all students access to high-quality texts, regardless of their reading ability. Through multiple readings of passages from the text, I was amazed at my students’ ability to explain and retain words, both orally and in writing, and even to use them in everyday conversations.
After we read Monica Brown’s Waiting for the Biblioburro, a student exclaimed, “Mrs. Hanifan, you inspired my mom to create her own fry bread!” The students had learned the word inspired from the text and began to use it in their own lives. I now use a critical lens when I’m selecting books for my students to engage with. I question who is represented or missing in the text, what is the focused content, and how is the text written.
Swapping sight word memorization for heart words: Many people, myself included, believed that rote memorization with flash cards was the way kids built their high-frequency word knowledge. However, most of these words can be sounded out phonetically and should be taught explicitly. This promotes orthographic mapping, the process whereby words are stored in memory. The “heart” reminds us that this part of the word needs to be learned “by heart.”
Before I began teaching the heart word method, I reviewed my scope and sequence and compiled all of the high-frequency words introduced. I then sorted them phonetically. This way, I could teach them explicitly as part of my whole and small group lessons. The kids are excited and notice heart words everywhere. This method has helped them remember how to read and spell a word when they hear it orally or see it in print.
Teaching reading explicitly and systematically has transformed the practice in my classroom and set all of my students up for success.
If you think others need to see this, share it on one of the sites below by clicking on the button.
I’ll be honest with you: I remember first learning about Bloom’s Taxonomy when I was getting my teaching credential but I never really thought it was that big of a deal. I had a decent understanding of what it was and how you could implement it. What I didn’t get was why it mattered.
As we transition to the Common Core State Standards where Webb’s Depth of Knowledge (DOK) is the taxonomy of choice, the sentiment remained: why does depth of knowledge matter? I recently had an eye-opening experience that has helped me realize that depth of knowledge is more critical than I ever realized and I want to share that experience with you so you can understand what we should be working towards.
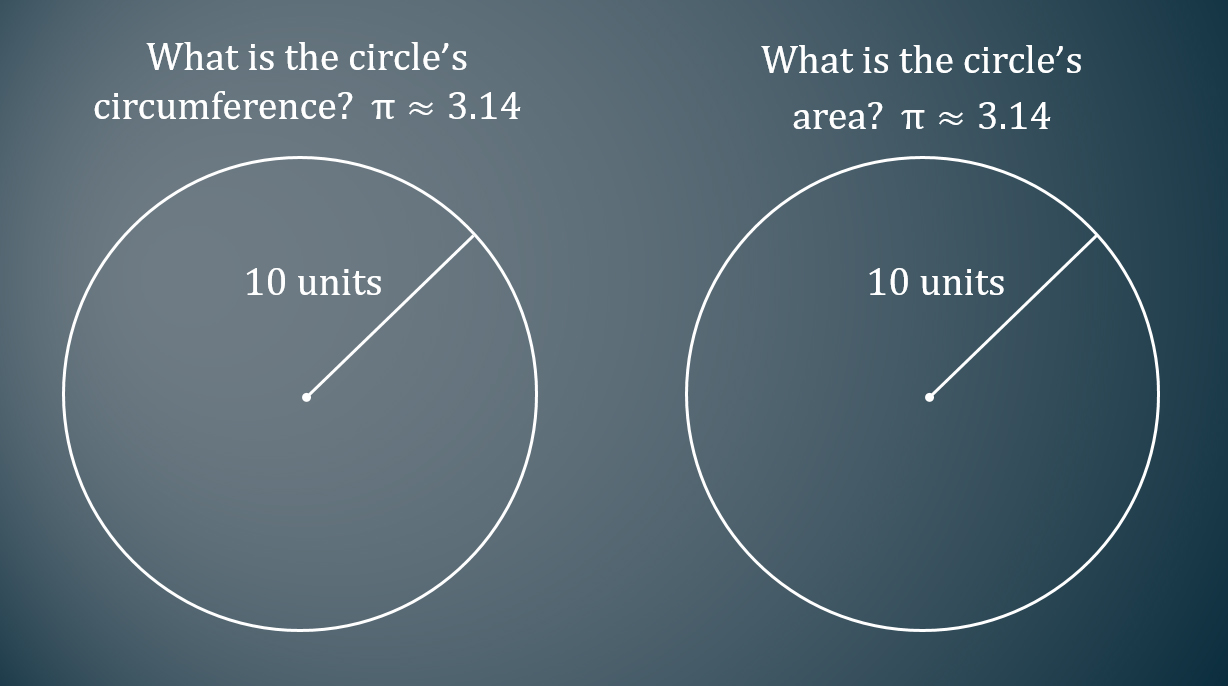
I was working with a strong and motivated team of seventh grade math teachers in my school district. We were in the process of creating an assessment to measure students’ understanding of CCSS 7.G.4 which states, “Know the formulas for the area and circumference of a circle and use them to solve problems; give an informal derivation of the relationship between the circumference and area of a circle.”
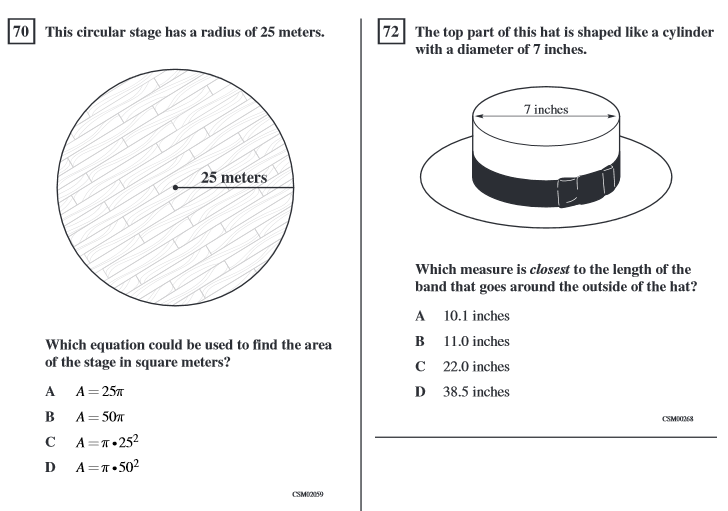
Area and circumference of circles was previously a 6th grade standard in California. On the outgoing California Standards Test (CST), this standard was assessed using questions like the ones below from the released test questions. All of the released test questions for this topic were DOK 1.
Accordingly, we decided to include two DOK 1 questions like these in the assessment.
Most students answered these two DOK 1 questions correctly. Here are ten students who exemplify the process many of their peers used.
All ten of the students answered both of the DOK 1 questions correctly. As a comparison, of the 396 seventh grade students assessed:
68.26% correctly answered the circumference question
78.59% correctly answered the area question
In years past, that would have been the extent of the assessment. However, we wanted to know the depth of knowledge that students would be expected to demonstrate under the Common Core State Standards. To determine this, and since California is a member of the Smarter Balanced Assessment Consortium (SBAC), we looked at the SBAC Preliminary Test Blueprint which lists the DOK levels that students will be assessed at. As you can see below, it shows that the cluster this standard is a part of will be assessed at DOK 1 and/or 2.
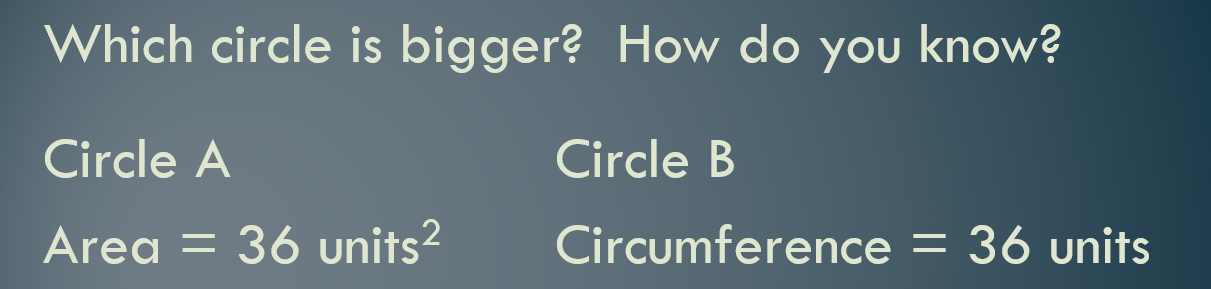
However, after seeing the SBAC Preliminary Test Blueprint we wondered, “What does a DOK 2 question for this standard look like and where would we find one?” We couldn’t find one online or in our textbook so we spent about 15 minutes thinking of ideas, and eventually came up with this question below:
It honestly didn’t seem that impressive or that big of a difference to us. We weren’t even sure if it really reached the DOK 2 level. Ultimately we decided to include it on the assessment. We graded this question by hand using the two-point SBAC rubric for evaluating constructed response questions which states:
For full credit (2 points):
Student reaches the correct conclusion AND student provides sufficient reasoning to support this conclusion.
For partial credit (1 point):
Student reaches the correct conclusion but does not provide sufficient reasoning to support this conclusion OR
Student does not reach the correct conclusion but provides reasoning to support this conclusion that contains a minor conceptual or computation error.
Here are the same ten students answering the DOK 2 question:
Of the ten students, only one earned two points. Six earned one point and the remaining three earned zero points. As a comparison, of the 396 seventh grade students assessed only 12.12% earned two points on the DOK 2 question.
We were shocked. We thought that there might be a difference in results between the two types of questions but we didn’t think it would be this dramatic.
Some interesting additional facts:
97.92% of the students who correctly answered the DOK 2 question also correctly answered both of the two DOK 1 questions. So, correctly answering the DOK 2 question was a strong predictor of students’ ability to answer both of the DOK 1 questions correctly.
10.61% of the students who correctly answered both of the two DOK 1 questions also correctly answered the DOK 2 question. So, correctly answering both of the DOK 1 questions did not mean students would be able to answer the DOK 2 question.
28.28% of the students earned only one point. All of them earned one point by choosing Circle B and providing insufficient reasoning. Among the most common explanations determined to have insufficient reasoning were:
“Area is always bigger than circumference”
“Area is everything inside the circle and circumference is everything outside the circle. There is always more space outside of a circle.”
59.59% of the students earned no points meaning they picked circle A and had insufficient reasoning.
Here were our takeaways:
We have had a false belief that students were proficient with this standard because we assessed them with questions that measured shallow depths of knowledge.
We don’t know exactly why students got the DOK 2 problem wrong and it requires more investigation. Did they get the DOK 2 problem wrong because:
the DOK 1 problems asked students to plug in the radius and go forward while the DOK 2 problem asked them to work backwards to find the radius?
the DOK 1 problems told students exactly what action to take (i.e., find the area or circumference) while the DOK 2 problem did not give specific instructions and students had to figure out how to connect the two circles?
It isn’t fair to assess students at higher DOK levels when we haven’t incorporated them into our instruction. Hence, we better incorporate them into our instruction.
Finding DOK 2 and DOK 3 questions can be really challenging. Hence, my real life colleague, Nanette Johnson, and I created a website called Open Middle (based on inspiration from a Dan Meyer presentation) where we have a growing number of higher DOK problems. Check it out and you will find a variety of problems you can immediately use.
Charlotte Danielson’s Framework for Teaching is changing soon! Hear from Dr. Jim Furman, Executive Director of the Danielson Group, and Wendy Amato as they discuss those upcoming changes and how they’ll help support the individual and collective efforts of teachers and administrators in positively impacting student learning. You’ll also hear instructional coaching strategies that will educators grow at every stage of their careers.
Our Guest
Dr. Jim Furman has years of teaching experience at middle and high schools around the country. Jim has supported school leaders in urban schools to build and improve systems of teacher professional development; redesigned teacher preparation programs, field experiences, and assessments; and conducted research focused on teacher preparation and adolescent literacy.
Our Host
Wendy Amato earned her Master’s in Education and Ph.D. in Curriculum and Instruction from the University of Virginia. She holds an MBA from James Madison University. Wendy began teaching in 1991, has served as a Middle School Administrator, and still teaches at UVA’s School of Education. She has delivered teacher professional development workshops and student leadership workshops in the US and internationally. Wendy and her family live near Charlottesville, Virginia.
When kids first begin talking, typically at around 12 months of age, they of course stick to the basics— very short phrases that convey basic wants, needs, and social routines. Mama. More. Up. Hi! All-done. Milk. Doggy. Bye-bye. Oops! These are mostly one-word phrases and are not pronounced perfectly. Then, typically when children are between 1 ½ and 2 years old, they take an important step in language learning: making word combinations. More milk. Mama car. Up Daddy. No doggy. The intended meaning of early phrases might not be very clear out of context (Mama car could mean “look, there’s mommy’s car” or “here mommy, take my toy car”), but a child at this stage of language development shows us that he is beginning to understand that words are units of meaning that can be combined in novel ways to creating novel meanings, as in Mama car. Big car. Car up. Once we know a good number of words and understand our language’s grammar, we can combine words to generate phrases that explain anything we want. That is, language is generative. The possibilities are literally endless.
Sometime around 2 years old, children usually begin using grammatical morphemes, or the little parts of words that make our phrases grammatically complete, and can express nuances like tense and number. One of the earliest in English is the present progressive -ing, as in crying, eating, going. Regular plurals (cups) and regular past tense (climbed) are also acquired pretty early on. As children learn new grammatical forms, they are not just memorizing whole words. Rather, they are learning the grammatical rules of whatever language (or languages) they are acquiring. They learn how we can take these little word parts and apply them to other words we know, to create new shades of meaning. For example, boat means something different than boats; walking means something different than walked.
The morphemes for plural and past tense are a little more complicated than they may appear at first glance. There are actually three different pronunciations for each of these grammatical markers, depending on the sound at the end of the root word.
Root word ends in:
Plural “-s” morpheme sounds like:
/p, t, k, f, th (voiceless)/
/s/ as in cups, hats, snacks, cliffs, baths
/b, d, g, m, n, ng, v, th (voiced), l, r/
and any vowel sound
/z/ as in tubs, beds, bags, drums, hens, songs, doves, lathes, balls, cars, cows, bees, pies
/s, z, sh, ch, j/
/ez/ as in buses, sizes, bushes, watches, badges
Root word ends in:
Past tense “-ed” morpheme sounds like:
/p, k, f, th (voiceless), s, sh, ch/
/t/ as in hopped, walked, coughed, birthed, flossed, washed, watched
/b, g, m, n, ng, v, th (voiced), z, j/
and any vowel sound
/d/ as in rubbed, hugged, hummed, banned, arrived, bathed, buzzed, waged, bowed, peed, tied
/t, d/
/ed/ as in batted, glided
These context-dependent variations on morphemes are calledallomorphs. So using the above examples, /s, z, ez/ are allomorphs of the regular plural morpheme -s, and /t, d, ed/ are allomorphs of the regular past tense morpheme -ed. Despite the different sounds, children are typically able to learn and apply grammar rules just by talking with adults around them, without even being aware that these variations exist. Our knowledge of spoken grammar is mostly subconscious: you don’t even know that you know it. In fact, I would wager that most adults who have not studied linguistics or early literacy instruction are not aware of allomorphs, and also probably can’t easily explain other grammar basics, such as when exactly we use he versus him and that the suffix -ly is used to change an adjective to an adverb.
So how do we know that little kids are actually applying their knowledge of grammatical rules, rather than just learning new grammatical words as whole units, parroting words they have heard mom or dad say? After all, most 2-year-olds won’t say, “Today I learned that I have to put a sss, zzz, or ez at the end of the word to indicate that there is more than one thing.” How do we know that they know that?
For starters, children will begin to apply a rule more and more consistently, using it across multiple contexts, which suggests that the rule is acquired. Furthermore, we hear evidence of grammar knowledge in the errors and inventions that are so common in the speech of young children. When children make errors such as mouses instead of mice, they have not likely heard an adult say the word mouses, meaning they just came up with it on their own. This is an example of overgeneralization of a grammatical morpheme- using it where it doesn’t actually belong. While it’s technically not correct to say mouses, it’s a normal stage of language development and shows that the child can generate words using the plural marker.
I recently polled an online parenting forum for examples of such inventions of words. The post generated a lot of interest, and responses were both adorable and brilliant. Let’s take a look at some, and see what they tell us about those children’s understanding of spoken grammar.
Quite a few kids demonstrated understanding of present progressing -ing. As mentioned, it is one of the earlier emerging grammatical morphemes, and so there’s a lot of opportunity for kids to get creative. There was a girl who said someone doing yoga in the park wasnamasteing. A boy was wapping things with his wapping stick. Another child used puzzling to mean playing with puzzles. In the autumn, the leaves are fall-downing. You go grossing at the grocery store. A truck is back-upping. And finally, I AM carefulling!!
There was a child who stuck two allomorphs at the end of words to mark plurals: carses, cookieses, toeses. (Moses supposes his toeses are roses?) Another child mistook the word much for a noun, and showed her ability to use the plural /ez/ allomorph: so many muches.
soooo many muches!!
One child said at bedtime Can you cush and coze me?meaning that she wanted her mom to make her cushy and cozy. This represents an understanding of the suffix -y in adjectives. She knows that -y often means having the quality of the root word (which could be either nouns as in sandy or verbs as in runny), and so invented root word verbs cush and coze.
This next one is particularly genius, in a couple of ways. A child apparently said that when the family car got new tires, it was retired. This shows an understanding of the prefix re-, meaning to do something again (to again put tires on a car). Then, adding -ed in this case changes the word from a noun to an adjective, called a participial adjective (as in I am bored). Also, we know that retired is a word that actually does exist, although it means something completely different. Likely this child heard that word at one point, and used his smarts about morphology to infer a possible meaning. Genius!
Here’s a neat one: a child used willn’tinstead of won’t, apparently having analyzed all the other n’t contractions and determining that they should closely resemble the words from which they are derived (as in do-don’t, can-can’t, should-shouldn’t). So of course the opposite of will is willn’t. I’d like to see how many grown-ups have thought of that. Not me, to be honest, and I think about a lot of stuff like this. Thanks, kiddo, for pointing me towards this explanation.
Another little girl apparently used peace-ifyin the place of pacify, I’m guessing in the context of talking about a baby’s pacifier bringing about a moment of peace. That parent basically has a mini etymologist on her hands, because this kid probably already knows that both peace and pacify come from the Latin word pax, and the suffix -ify changes a word to a verb that means to become the root word.
Similar to the cush and coze example, this one involves the child removing a part of a word. Hammers are what you use the ham things. The -er suffix changes a word from an action to a thing that does the action. Workers work. Players play. Hammers ham. Of course!
I want so badly for this next one to be correct: the child who thought that the opposite of nocturnal was turnal. It’s brilliant, because a) the kid already knows the word nocturnal b) it still shows awareness that words can break into parts, and c) noc sounds like not, so it’s a pretty reasonable guess! Alas, in this case, noct comes from the Latin nox for night. (The opposite of nocturnal is diurnal, which I’m not sure I’ve ever heard in my life.)
Threeth. Not a word, but the kid who said it gets that the suffix -th is used to express the ordinal numbers such as fourth, twentieth, and billionth (but not first, second, third).
Some kids were able to show understanding of morphemes for negation: dis-,un-, and de-. One wanted to be disbored(bored of being bored?), another who wanted his friend to beunsick so they could play, and another who said he would never delove his mother (I’m not crying, you’re crying!!).
These next ones involve little phrases. English has many two-word verbs, such as shut down, figure out, fit in, that are often idiomatic phrases (and notoriously difficult for English second-language speakers). A few parents shared examples that demonstrate that the child knows that grammatically there is such thing as a two-word verb, but hasn’t quite gotten it right: pick me down, buckle me out, and tuck me up(ok, that last one is my own son).
Next, some examples from bilingual or multilingual households, where kids sometimes mix vocabulary and grammar from more than one language in the same phrase. For example, a little girl who said lumes to mean that something lit up. This is a sweet mash-up of French luminer and English -s third person singular. She also used unlâcheto tell someone let go of something. This shows that she likely knows the un- English morpheme for negation, but lâche in French already means let go.
Another bilingual child was mad because her brother retruiredher castle. The child combined re-, détruir (destroy), and the English past tense -ed. Seems like someone wrecked that castle a few times over.
And finally, because no story about preschoolers in complete without reference to poop and/or boogers: microttes. This one is a portmanteau, or a word coined by blending two words, such as breakfast + lunch = brunch. A child from a trilingual French-Spanish-English house apparently regularly invented her own words and one day came up with microttes as a combination of microbes (germs) and crottes (boogers/little poops). Great! And gross, so let’s go wash our hands, shall we?
Are you curious about the age at which children typically acquire grammatical morphemes? Although we have a pretty clear picture of the sequence of development of early grammar, the age of acquisition varies a lot from child to child. This chart can give a general idea, though a word of caution: age estimates are based on observations of a rather small number of children.
Grammatical morpheme
Examples
Common age of acquisition
Present progressive ing
Prepositions on, in
Regular plural
Eating.
On the table. In the car.
Dogs, cats
27-30 months
Irregular past tense
Possessive ‘s
Uncontractible copula
It fell.
Mommy’s coffee
Is it here? It is!
31-34 months
Articles a, the
Regular past tense
3rd person singular -s
A flower. The car.
I licked my ice cream.
He likes pizza.
35-40 months
3rd person of have, do
Forms of the verb be
He has a dog. She does yoga.
He is climbing. I’m not sliding, but she is. Are you hungry?
This post has been about children’s development of spoken grammar. Some children need extra help with this, but, as previously mentioned, children learn spoken language mostly by simply talking with others. Little kids don’t need to worry about understanding how grammar works in spoken language, because they unconsciously learn the rules. However, we know that learning written language is not the same process. In order to efficiently acquire literacy skills, school-aged children benefit from explicit teaching of many aspects grammar. For example, many young children will write stopped as stopt and hugged as hugd. When we teach kids that the letters ed at the end of a word represent the regular past tense, we are teaching morphological awareness. This helps developing readers decode, understand, and spell complex words such as impossible, cooperation, mismanagement, unfathomable. But morphological awareness is a huge topic for another day. Willn’t you stay tuned??
Posted in ReadingLanguage is always evolving, with new words (bingeable, superspreader), new expressions (I can’t even), and even shifting syntax (Have you any? vs Do you have any?) and grammar (the fading subjunctive: If I were…). But the main topic of interest today is shifts in pronunciation. The way we pronounce words changes slowly over time, often specific to a geographical area or demographic, resulting in a patchwork of different accents among speakers of the same language.
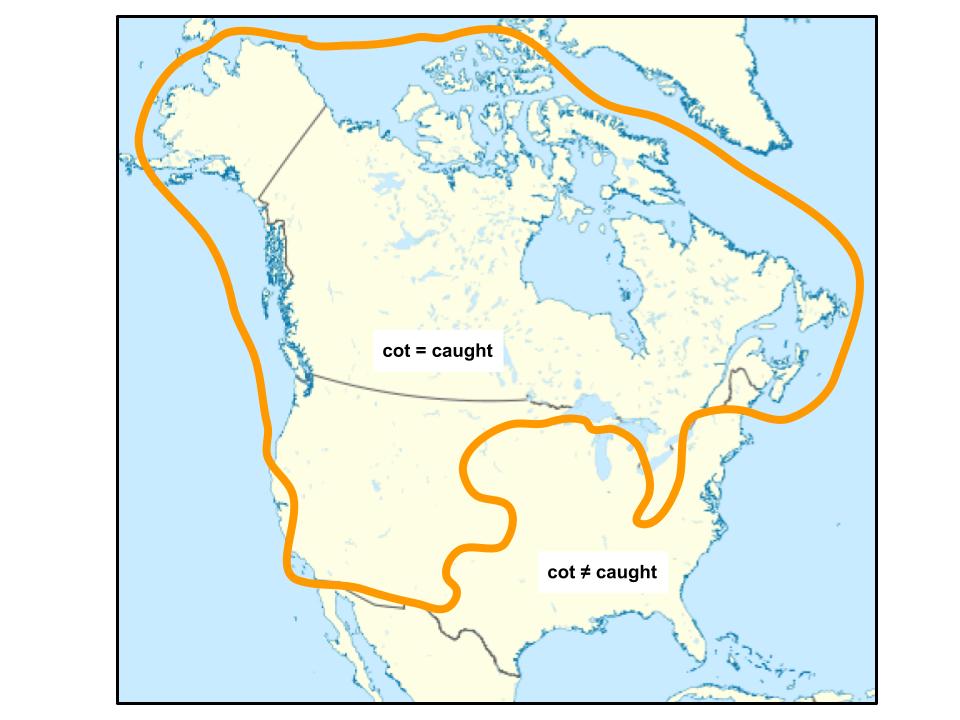
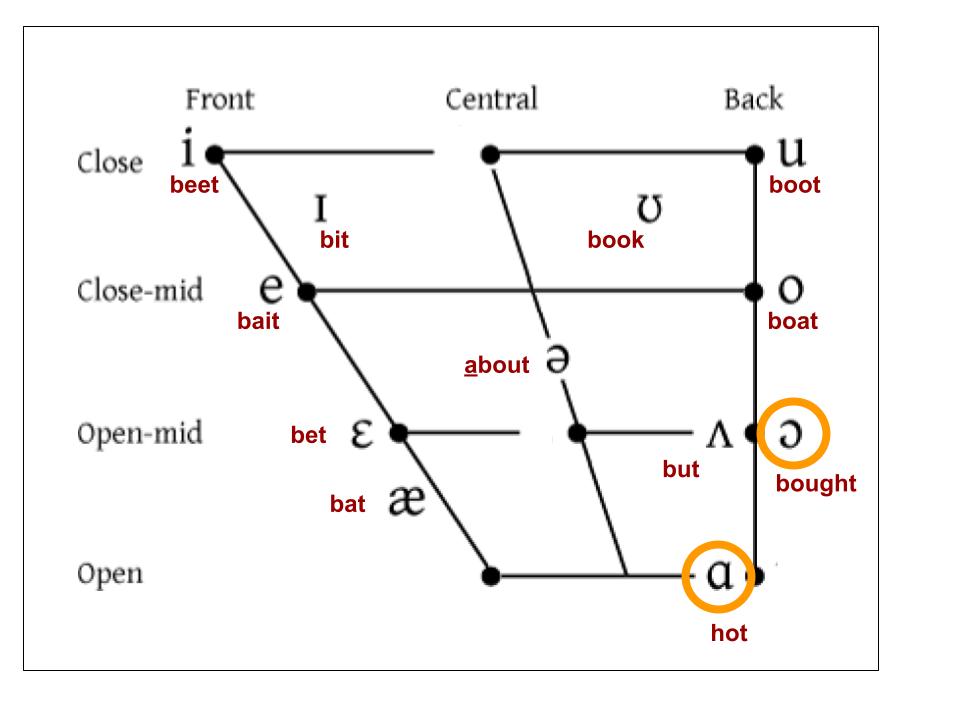
Pronunciations can sometimes change so much that sounds that were once distinctly different are now pronounced exactly the same. This is known as a merger. A well-known and wide-spread example of this is the low-back merger, a.k.a. the cot-caught merger, where the vowels in the words cot and caught have evolved so that they are no longer two distinct sounds. Depending on where you live, you might be thinking one of two things right now: Of course “cot” and “caught” sound exactly the same! or There’s no way that “cot” and “caught” sound the same! Pretty much all Canadians have the cot-caught merger, while the US population is split between merged and unmerged. As a result, although the different spellings remain, the vowel sounds in the words cot/caught, nod/gnawed, stock/stalk are identical for some English speakers and not for others. If you have the cot-caught merger and have a hard time understanding how other people can possibly produce and perceive these as two different sounds, you may like to check out this video.
Cot and caught sound the same in Canada, and much of the western US. They are distinct in much of the eastern US.
A vowel chart shows English vowels arranged by place of articulation, from the front to the back of the mouth, from closed to open mouth, with cot and caught not merged.
This is all very interesting, but what’s the application to literacy instruction? Well, this is an issue that comes up surprisingly often in online forums for literacy and language enthusiasts, including a few times recently in a wonderful community on Facebook called Science of Reading- What I Should Have Learned in College, a group dedicated to sharing knowledge about evidence-based practice in literacy. People in this group know that a very efficient way to teach kids to read and spell involves having them pay attention to the sounds in their spoken words, and then linking these sounds to the letters of our alphabet. This approach is aptly called speech to print.
There are many published materials that help teachers apply the speech to print approach. A slight issue is that some of them may not discuss dialectal differences like the cot-caught merger. So, what happens when one of the millions of people who has the cot-caught merger comes across these materials? Occasionally, some confusion. Huh, have I been pronouncing these words wrong my whole life? Am I actually making a barely perceptible distinction between these two sounds? Should I help my students make/hear a difference between these sounds? Thankfully, the answer is no, no, and no. If you don’t have the distinction in your dialect, you simply don’t have it, because they are the same sound.
If you are one of the millions of speakers with the low-back merger, you don’t need to toss out great instructional materials that differentiate between these sounds. We just need to understand the phenomenon, so that we can treat the o in fox and the aw in saw as two different graphemic representations of the same sound, without trying to force a distinction that just isn’t there. If you speak a dialect with the cot-caught merger, the o in fox and the aw in saw are as much the same sound as the ee and ea in tree and treat, which at one time were also distinct sounds that have completely merged for most dialects of English, as of around 300 years ago.
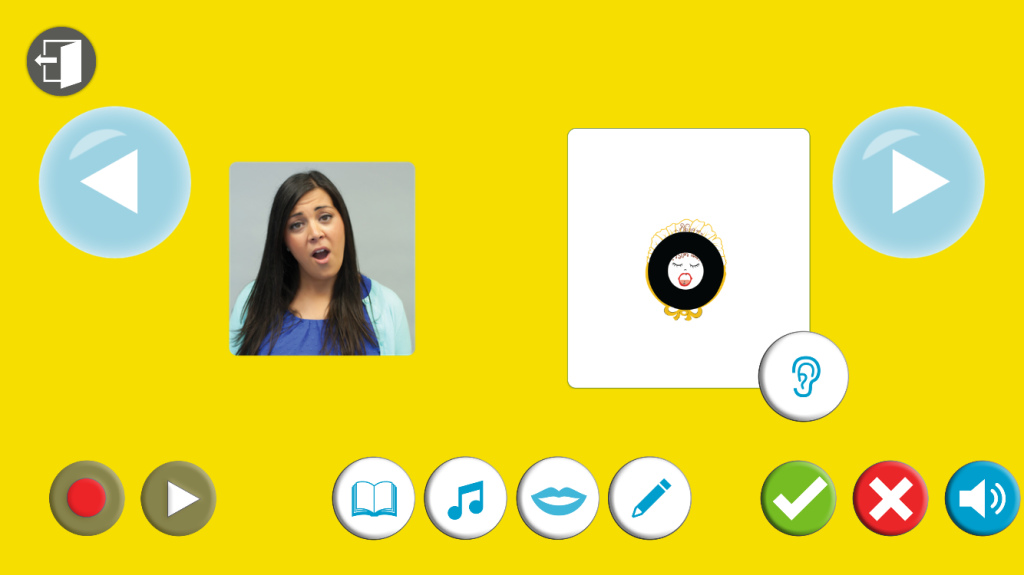
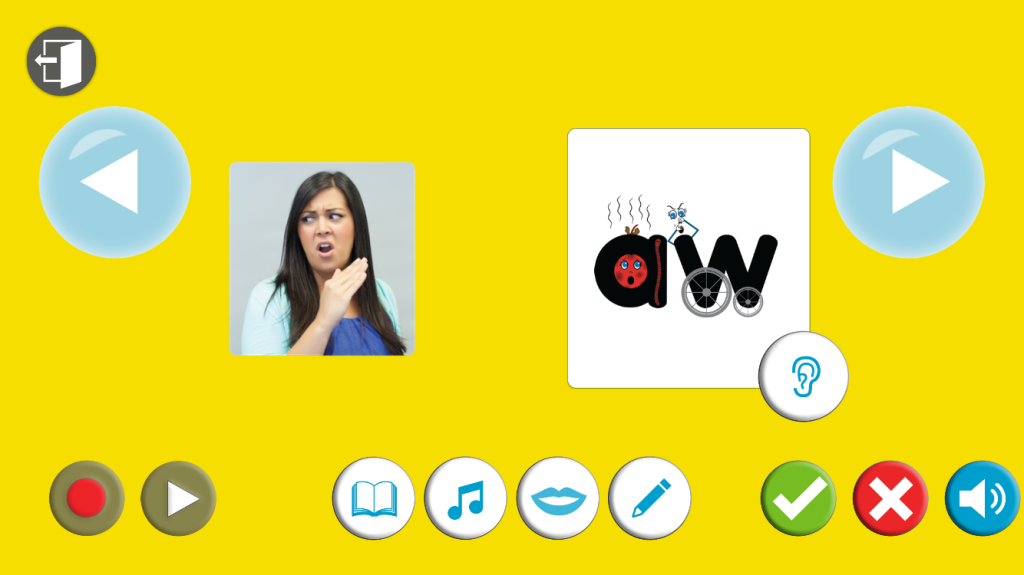
In Lively Letters (Telian & Castagnozzi), different gesture cues normally indicate different sounds.
If you have the low-back merger, just pronounce these the same, and you’re all set!
One precision. The graphemes for the o and aw/au sounds do not present exactly the same scenario as ee vs ea. The graphemes ee and ea are both vowel teams: two vowel letters representing one vowel sound, as in meet and meat. In contrast, o is a short vowel, while aw/au function like vowel teams. Diving a little deeper, a careful look at English orthography reveals that a number of spelling rules depend on whether a syllable contains a short vowel or vowel team. For example, we use -ck at the end of a short word following a short vowel, as in rock, while the word hawk requires only -k after the vowel team aw. So, even if they sound the same for you, it probably makes sense to clearly differentiate short o from vowel teams au/aw because it helps us make sense of spelling patterns. As a Canadian, if I were making a sound wall to help children understand the sounds of English, I would put o and aw/au stuck right together, side-by-side, and I would of course pronounce them exactly the same.
From Speech to Print: Language Essentials for Teachers by Louisa Moats. The cot and caught vowels are differentiated in this chart (fox and saw), though the book discusses dialectal differences. Other spellings for o/aw/au are also shown.
Just to complicate things a little further, not all speakers who have distinct vowels for cot and caught divide these two sounds the same way. The Atlas of North American English (Labov et al, 2006) explains that in certain contexts, mainly before the voiceless continuant sounds /f, s, th/ (as in off, loss, cloth) and before the /g/ sound (as in dog, frog), words with the short o are actually spoken with a vowel closer to the sound heard in saw/caught. Hence, hot-dog actually has two different vowel sounds for some speakers, because of the influence of the consonant sounds at the end of each syllable. Isn’t phonology interesting??
So, what do you do if a curious young mind notices that the o and aw/au are represented by different pictures or gestures, or appear as different on the vowel sound chart, and yet have the same sounds? Rather than give the all-too-common response “English is complicated! That’s just how it is!”, you could see it as a neat opportunity to introduce dialect differences and language change: “Some people pronounce these differently, but for us they are the same.”
Does this seem a little complicated? Like very many aspects of literacy and language, the underlying ideas are pretty complex, but that doesn’t mean that it needs to be for children. Doctors have oodles of deep knowledge that informs their sometimes simple advice to patients. Similarly, when educators understand the complexities of our language- both the oral and the written systems- they are in a much better position to teach it to young learners, using simple explanations adapted to the children’s needs and capabilities.
I love this topic, because it is a great example of how there is so much knowledge to be shared when people from a variety of backgrounds- speech pathology, education, linguistics, psychology- come together to look at practices in literacy. Does this sort of knowledge float your boat, bake your cake, rock your socks? You will no doubt love Speech to Print: Language Essentials for Teachers by Louisa Moats, a comprehensive resource about the oral language underpinnings of literacy development.
References:
Labov, William & Ash, Sharon & Boberg, Charles. (2006). The Atlas of North American English: Phonetics, Phonology and Sound Change. 10.1515/9783110206838.
Moats, L. C. (2020). Speech to print: Language essentials for teachers, 3rd ed. Baltimore: Paul H. Brookes Pub.
Language is always evolving, with new words (bingeable, superspreader), new expressions (I can’t even), and even shifting syntax (Have you any? vs Do you have any?) and grammar (the fading subjunctive: If I were…). But the main topic of interest today is shifts in pronunciation. The way we pronounce words changes slowly over time, often specific to a geographical area or demographic, resulting in a patchwork of different accents among speakers of the same language.
Pronunciations can sometimes change so much that sounds that were once distinctly different are now pronounced exactly the same. This is known as a merger. A well-known and wide-spread example of this is the low-back merger, a.k.a. the cot-caught merger, where the vowels in the words cot and caught have evolved so that they are no longer two distinct sounds. Depending on where you live, you might be thinking one of two things right now: Of course “cot” and “caught” sound exactly the same! or There’s no way that “cot” and “caught” sound the same! Pretty much all Canadians have the cot-caught merger, while the US population is split between merged and unmerged. As a result, although the different spellings remain, the vowel sounds in the words cot/caught, nod/gnawed, stock/stalk are identical for some English speakers and not for others. If you have the cot-caught merger and have a hard time understanding how other people can possibly produce and perceive these as two different sounds, you may like to check out this video.
Cot and caught sound the same in Canada, and much of the western US. They are distinct in much of the eastern US.
A vowel chart shows English vowels arranged by place of articulation, from the front to the back of the mouth, from closed to open mouth, with cot and caught not merged.
This is all very interesting, but what’s the application to literacy instruction? Well, this is an issue that comes up surprisingly often in online forums for literacy and language enthusiasts, including a few times recently in a wonderful community on Facebook called Science of Reading- What I Should Have Learned in College, a group dedicated to sharing knowledge about evidence-based practice in literacy. People in this group know that a very efficient way to teach kids to read and spell involves having them pay attention to the sounds in their spoken words, and then linking these sounds to the letters of our alphabet. This approach is aptly called speech to print.
There are many published materials that help teachers apply the speech to print approach. A slight issue is that some of them may not discuss dialectal differences like the cot-caught merger. So, what happens when one of the millions of people who has the cot-caught merger comes across these materials? Occasionally, some confusion. Huh, have I been pronouncing these words wrong my whole life? Am I actually making a barely perceptible distinction between these two sounds? Should I help my students make/hear a difference between these sounds? Thankfully, the answer is no, no, and no. If you don’t have the distinction in your dialect, you simply don’t have it, because they are the same sound.
If you are one of the millions of speakers with the low-back merger, you don’t need to toss out great instructional materials that differentiate between these sounds. We just need to understand the phenomenon, so that we can treat the o in fox and the aw in saw as two different graphemic representations of the same sound, without trying to force a distinction that just isn’t there. If you speak a dialect with the cot-caught merger, the o in fox and the aw in saw are as much the same sound as the ee and ea in tree and treat, which at one time were also distinct sounds that have completely merged for most dialects of English, as of around 300 years ago.
In Lively Letters (Telian & Castagnozzi), different gesture cues normally indicate different sounds.
If you have the low-back merger, just pronounce these the same, and you’re all set!
One precision. The graphemes for the o and aw/au sounds do not present exactly the same scenario as ee vs ea. The graphemes ee and ea are both vowel teams: two vowel letters representing one vowel sound, as in meet and meat. In contrast, o is a short vowel, while aw/au function like vowel teams. Diving a little deeper, a careful look at English orthography reveals that a number of spelling rules depend on whether a syllable contains a short vowel or vowel team. For example, we use -ck at the end of a short word following a short vowel, as in rock, while the word hawk requires only -k after the vowel team aw. So, even if they sound the same for you, it probably makes sense to clearly differentiate short o from vowel teams au/aw because it helps us make sense of spelling patterns. As a Canadian, if I were making a sound wall to help children understand the sounds of English, I would put o and aw/au stuck right together, side-by-side, and I would of course pronounce them exactly the same.
From Speech to Print: Language Essentials for Teachers by Louisa Moats. The cot and caught vowels are differentiated in this chart (fox and saw), though the book discusses dialectal differences. Other spellings for o/aw/au are also shown.
Just to complicate things a little further, not all speakers who have distinct vowels for cot and caught divide these two sounds the same way. The Atlas of North American English (Labov et al, 2006) explains that in certain contexts, mainly before the voiceless continuant sounds /f, s, th/ (as in off, loss, cloth) and before the /g/ sound (as in dog, frog), words with the short o are actually spoken with a vowel closer to the sound heard in saw/caught. Hence, hot-dog actually has two different vowel sounds for some speakers, because of the influence of the consonant sounds at the end of each syllable. Isn’t phonology interesting??
So, what do you do if a curious young mind notices that the o and aw/au are represented by different pictures or gestures, or appear as different on the vowel sound chart, and yet have the same sounds? Rather than give the all-too-common response “English is complicated! That’s just how it is!”, you could see it as a neat opportunity to introduce dialect differences and language change: “Some people pronounce these differently, but for us they are the same.”
Does this seem a little complicated? Like very many aspects of literacy and language, the underlying ideas are pretty complex, but that doesn’t mean that it needs to be for children. Doctors have oodles of deep knowledge that informs their sometimes simple advice to patients. Similarly, when educators understand the complexities of our language- both the oral and the written systems- they are in a much better position to teach it to young learners, using simple explanations adapted to the children’s needs and capabilities.
I love this topic, because it is a great example of how there is so much knowledge to be shared when people from a variety of backgrounds- speech pathology, education, linguistics, psychology- come together to look at practices in literacy. Does this sort of knowledge float your boat, bake your cake, rock your socks? You will no doubt love Speech to Print: Language Essentials for Teachers by Louisa Moats, a comprehensive resource about the oral language underpinnings of literacy development.
References:
Labov, William & Ash, Sharon & Boberg, Charles. (2006). The Atlas of North American English: Phonetics, Phonology and Sound Change. 10.1515/9783110206838.
Moats, L. C. (2020). Speech to print: Language essentials for teachers, 3rd ed. Baltimore: Paul H. Brookes Pub.
Anchor Chart: it’s a phrase used commonly in education.
They adorn walls in classrooms across the country, and, when used correctly, they can be an excellent instructional tool.
But sometimes the phrase “anchor chart” is used to refer to something that isn’t an anchor chart at all. It’s a poster.
So what’s the difference?
Let’s start with anchor charts. There are a few things that make them special:
Anchor charts are…
made DURING the lesson.
records of student and teacher thinking.
an anchor (ahhhh) for student learning.
placed on the wall to help students recall the lesson experience and content.
replaced when they are no longer needed or useful to students.
interactive. They can be added to over time.
full of student and teacher handwriting.
purposeful.
Anchor charts are not…
printed out from a file or teacher-created and possibly laminated.
done BEFORE the lesson.
records of teacher thinking or information only.
static; remaining the same over time.
wallpaper in the classroom.
the same year after year.
decorations.
Those are posters.
So let’s talk a little bit about how to use anchor charts effectively.
Tip #1: Use them purposefully.
Anchor charts come into play when there’s an important concept and learning experience that you want kids to recall. You may be a planner: you may know in advance that you plan to use an anchor chart to record and think through the lesson with kids. But you might not. You may be suddenly inspired during a lesson, whip out a blank chart paper, and go to town! Either way is ok!
That being said, you probably don’t want an anchor chart for every single lesson. It’s overwhelming and cluttered. You may want to identify the main concepts you want kids to have a reference for and build charts in those situations. As charts become outdated or unnecessary, take them down so you can replace them with current ones.
You can save the old charts, if you think kids will need to refer to them later. You can also just stack new charts on top of the old chart, by stapling only across the top.
Tip #2: Do some thinking first.
Some people have a template for the anchor chart before they begin the lesson. Having a general idea of structure and organization for your chart is a good thing, but you don’t need (or even want) to have every last detail planned out. If you already know what you’re going to write on the chart, you’re less likely to allow for kid input.
It definitely helps to have kid-friendly definitions or language ready so you’re not fumbling for how to word certain things on your chart. Ideally, you’ll probably have this as part of your lesson planning anyway.
Tip #3 Include a learning target.
I try to include a learning target, purpose, or title on the chart. This helps kids recall what the point of the lesson was. I also will try to include the concept information (main bullet points of important ideas) needed for kids to recall the lesson later.
Tip #4 Try it out!
Then, we try the strategy out in the way that I want kids to try it later. We might use sentence starters, post-it responses, task cards, or a graphic organizer to help kids try out the strategy, and record it on the chart.
Tip #5 Don’t stress about beautiful-ness!
I keep it all-natural 🙂 I record as we go through the lesson. I try to use color well, but honestly, I usually forget. My charts are not beautiful or gorgeous. You can definitely see a difference between the charts I make as a sample and the charts I make in the moment in the classroom. And that’s ok! If they’re legible and they’re purposeful, and kids can access the information on them, they’re fine!
Some teachers take home charts after the fact to rewrite them. The issue with this is that, at that point, it no longer looks like the chart you made with your students during the lesson. It’s invariably organized differently or has information in different places. Will kids still refer back to it, or will it become wallpaper?
The main purpose of an anchor chart is to be a useful record for student reference. It anchors student learning to the chart. Posters, while they may be attractive and perfectly designed, are not anchor charts. They serve a completely different purpose.
Do you have any great tips for using anchor charts?
Save
More Example:
If you’ve read my previous post about anchor charts, you know that I feel pretty strongly about a few things.
They must be created with kids, during a lesson, and they shouldn’t just be wallpaper in the classroom.
Instead, we want charts that grow and can be added to as kids learn and try new things.
The best way to ensure that anchor charts don’t become wallpaper is to make them interactive. If kids can interact with charts, they are more likely to learn the content and strategies that the chart represents.
Also, having their own handwriting on a chart, or their own work, can give them ownership over that learning.
And the more times we refer to a previous “anchor” lesson, the more it will solidify in kids’ brains.
So here are a few ways to do just that!
#1 Post-it try-its
Have kids try out the strategy or skill you’re working on. For example, on the first chart, we recorded characteristics and important details of two different texts to help us make connections. We figured out the lesson from the first text, and I had the kids figure out the lesson of the second text on their own. They wrote it on a post-it and we charted them up!
#2 Task cards
One easy way to have kids try out a skill or strategy is through using task cards. They’re equipped with short texts and they’re made for targeting specific skills. For this anchor chart, I had kids identify evidence on task cards for author’s purpose. They marked their evidence with yellow highlighter. Then we sorted the cards by author’s purpose. This interactive lesson required kids to practice the strategy and apply it right away. Then we used their thinking as evidence for our chart! You can grab the materials for this lesson here.
This isn’t exactly a task card, but I did provide groups of kids with a paragraph that they could analyze to find evidence and make inferences about characters. Kids marked their evidence and told me what to label on the chart. They love this activity! For some reason, marking up a paragraph in large font is so much more fun than marking up a little paragraph.
In this anchor activity, groups of students matched cards with examples of sensory language, the sense the language appealed to, and the effect of the language on the reader. They underlined their evidence on each card to prove their thinking.
Then we built a three-columned chart with their cards to have an anchor to refer back to! It was a great way to help kids get started with noticing sensory details in mentor texts.
Charts that kids can add to over time make great interactive reminders of their learning. They’re also helpful for setting a purpose for independent reading! For example, you can direct students to look for examples of figurative language, or specific types of characters, and add them to the chart.
For the charts below, I introduced a strategy (identifying theme, and describing characters) and the categories or types kids might encounter. Kids were encouraged to add the titles of books as they came across them, and in other cases we added the titles of texts we read together as a class.
Adding pictures of the covers is a great way to help kids remember the book, too!
#4 Post-its on graphic organizers
Blank graphic organizers make great anchor charts because they help kids organize information visually. For this chart about plot structure in fiction, we marked the important elements on the plot map with symbols. Then we recorded important events from the stories we read on post-its. We sequenced the events on the map. For a bonus, we pulled the post-its off of the plot map to represent cause and effect in the bottom right corner. This would make a great work station, too!
#5 Record of learning
For these interactive charts inspired by Lead4ward, we broke up the space into four different areas of focus: texts we read, summary elements, making inferences, and vocabulary. Each chart represented a different genre.
As we worked through texts, we added them to the chart. Sometimes students provided their copy that they’d written their thinking on to add to the chart! We also added question types that referred to summary elements and making inferences. As we came across important academic vocabulary, kids recorded the words on post-its and stuck them on the charts. Great way to record learning and to review later!
These are some of the fun ways I’ve used anchor charts to help kids record and interact with their learning. Which idea would you try?