In classes like social studies and science, students are expected to do complex nonfiction reading, but how can we ensure that they retain the content so that they can transfer it for future use?
One method is to ask students to represent the information in different forms, helping them grow their ability to think flexibly and critically.
These activities fall under “generalization” on the learning hierarchy and push students to use the information in a new way, making it more useful, and therefore, harder to forget.
These are some of the strategies that I have used in my classes. I am eager to add to the list.
Blackout Summaries
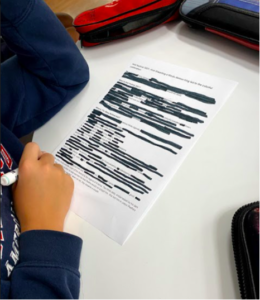
Writing blackout poetry is a literacy activity that I’ve used successfully for many years. After reading an article, students use markers to cross out words, leaving only a poem that summarizes what they’ve read.
As with most art, constraints improve the output: limit the number of words that students can use in a row, or set a minimum or maximum number of words.
Once the activity is complete, I like to have each table group choose the best from their team and then hang those around the classroom for a gallery walk. When they see the commonalities between the poems, it reinforces the main ideas of the text.
Scrambled Sections
During our study of world religions, I wanted to ensure students thoughtfully read an article about the Dalai Lama. To get them talking and processing, I spaced the Newsela article into segments and cut it into strips.
In small groups, students read the sections and arranged them into what they thought was the correct order. Once they had read it through and were sure that they had it right, I gave them the original article, printed in a different color.
I liked the reasoning in student conversations that arose from this activity. As an observer, I was also able to see which students were using text features to achieve their goal.
Collaborative Responses
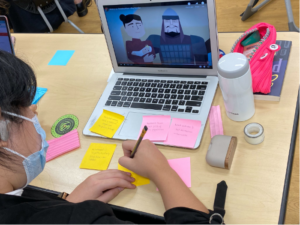
Each student in a table group gets their own color Post-it note, where they write their response to an open-ended question. They then share their responses with each other and decide upon the best, most thoughtful answer.
I would be careful with the pairings for this activity, as sometimes students assume they know who will have the best answer even when it isn’t the case. Each group then shares their chosen response with the class.
Tic Tac Tell
A student completes a Tic Tac Tell summary on the Nazca Lines.
I first learned about this activity from Glenn Weibe’s website many years ago. Vocabulary words related to the article are listed in a nine-block grid. Students then choose three words in a row to use in a paragraph summarizing their understanding. They highlight the selected words in the paragraph.
This would also be a fun way to start a class period by projecting a grid of nine important words from the previous lesson and asking students to share their understanding.
Rank the Evidence
Ask students to read an article or watch a video that has two perspectives; we watched the TED-Ed video on Genghis Khan as “Unifier or Tyrant.”
I gave students eight Post-its, four of each color, and asked them to write one piece of evidence per Post-it that supports each side of the argument. Next they ranked the evidence from strongest to weakest and decided which perspective was more convincing. The final step was to discuss their findings with a partner.
A Few More Quick Ideas
► After students read an article with the title removed, ask them to write what they think would be the best title for it and share with their table groups.
► Give students a photograph from history with conversation bubbles added. Ask them to practice perspective-taking and demonstrate understanding by adding dialogue to the image.
► Pair students up with a photo or image centered on a piece of blank paper. Ask them to have a silent, written conversation about what they notice or wonder. This is a great introductory activity that will give you insight into what the students already know about a topic.
Charlotte Danielson’s Framework for Teaching is changing soon! Hear from Dr. Jim Furman, Executive Director of the Danielson Group, and Wendy Amato as they discuss those upcoming changes and how they’ll help support the individual and collective efforts of teachers and administrators in positively impacting student learning. You’ll also hear instructional coaching strategies that will educators grow at every stage of their careers.
Our Guest
Dr. Jim Furman has years of teaching experience at middle and high schools around the country. Jim has supported school leaders in urban schools to build and improve systems of teacher professional development; redesigned teacher preparation programs, field experiences, and assessments; and conducted research focused on teacher preparation and adolescent literacy.
Our Host
Wendy Amato earned her Master’s in Education and Ph.D. in Curriculum and Instruction from the University of Virginia. She holds an MBA from James Madison University. Wendy began teaching in 1991, has served as a Middle School Administrator, and still teaches at UVA’s School of Education. She has delivered teacher professional development workshops and student leadership workshops in the US and internationally. Wendy and her family live near Charlottesville, Virginia.
When kids first begin talking, typically at around 12 months of age, they of course stick to the basics— very short phrases that convey basic wants, needs, and social routines. Mama. More. Up. Hi! All-done. Milk. Doggy. Bye-bye. Oops! These are mostly one-word phrases and are not pronounced perfectly. Then, typically when children are between 1 ½ and 2 years old, they take an important step in language learning: making word combinations. More milk. Mama car. Up Daddy. No doggy. The intended meaning of early phrases might not be very clear out of context (Mama car could mean “look, there’s mommy’s car” or “here mommy, take my toy car”), but a child at this stage of language development shows us that he is beginning to understand that words are units of meaning that can be combined in novel ways to creating novel meanings, as in Mama car. Big car. Car up. Once we know a good number of words and understand our language’s grammar, we can combine words to generate phrases that explain anything we want. That is, language is generative. The possibilities are literally endless.
Sometime around 2 years old, children usually begin using grammatical morphemes, or the little parts of words that make our phrases grammatically complete, and can express nuances like tense and number. One of the earliest in English is the present progressive -ing, as in crying, eating, going. Regular plurals (cups) and regular past tense (climbed) are also acquired pretty early on. As children learn new grammatical forms, they are not just memorizing whole words. Rather, they are learning the grammatical rules of whatever language (or languages) they are acquiring. They learn how we can take these little word parts and apply them to other words we know, to create new shades of meaning. For example, boat means something different than boats; walking means something different than walked.
The morphemes for plural and past tense are a little more complicated than they may appear at first glance. There are actually three different pronunciations for each of these grammatical markers, depending on the sound at the end of the root word.
Root word ends in:
Plural “-s” morpheme sounds like:
/p, t, k, f, th (voiceless)/
/s/ as in cups, hats, snacks, cliffs, baths
/b, d, g, m, n, ng, v, th (voiced), l, r/
and any vowel sound
/z/ as in tubs, beds, bags, drums, hens, songs, doves, lathes, balls, cars, cows, bees, pies
/s, z, sh, ch, j/
/ez/ as in buses, sizes, bushes, watches, badges
Root word ends in:
Past tense “-ed” morpheme sounds like:
/p, k, f, th (voiceless), s, sh, ch/
/t/ as in hopped, walked, coughed, birthed, flossed, washed, watched
/b, g, m, n, ng, v, th (voiced), z, j/
and any vowel sound
/d/ as in rubbed, hugged, hummed, banned, arrived, bathed, buzzed, waged, bowed, peed, tied
/t, d/
/ed/ as in batted, glided
These context-dependent variations on morphemes are calledallomorphs. So using the above examples, /s, z, ez/ are allomorphs of the regular plural morpheme -s, and /t, d, ed/ are allomorphs of the regular past tense morpheme -ed. Despite the different sounds, children are typically able to learn and apply grammar rules just by talking with adults around them, without even being aware that these variations exist. Our knowledge of spoken grammar is mostly subconscious: you don’t even know that you know it. In fact, I would wager that most adults who have not studied linguistics or early literacy instruction are not aware of allomorphs, and also probably can’t easily explain other grammar basics, such as when exactly we use he versus him and that the suffix -ly is used to change an adjective to an adverb.
So how do we know that little kids are actually applying their knowledge of grammatical rules, rather than just learning new grammatical words as whole units, parroting words they have heard mom or dad say? After all, most 2-year-olds won’t say, “Today I learned that I have to put a sss, zzz, or ez at the end of the word to indicate that there is more than one thing.” How do we know that they know that?
For starters, children will begin to apply a rule more and more consistently, using it across multiple contexts, which suggests that the rule is acquired. Furthermore, we hear evidence of grammar knowledge in the errors and inventions that are so common in the speech of young children. When children make errors such as mouses instead of mice, they have not likely heard an adult say the word mouses, meaning they just came up with it on their own. This is an example of overgeneralization of a grammatical morpheme- using it where it doesn’t actually belong. While it’s technically not correct to say mouses, it’s a normal stage of language development and shows that the child can generate words using the plural marker.
I recently polled an online parenting forum for examples of such inventions of words. The post generated a lot of interest, and responses were both adorable and brilliant. Let’s take a look at some, and see what they tell us about those children’s understanding of spoken grammar.
Quite a few kids demonstrated understanding of present progressing -ing. As mentioned, it is one of the earlier emerging grammatical morphemes, and so there’s a lot of opportunity for kids to get creative. There was a girl who said someone doing yoga in the park wasnamasteing. A boy was wapping things with his wapping stick. Another child used puzzling to mean playing with puzzles. In the autumn, the leaves are fall-downing. You go grossing at the grocery store. A truck is back-upping. And finally, I AM carefulling!!
There was a child who stuck two allomorphs at the end of words to mark plurals: carses, cookieses, toeses. (Moses supposes his toeses are roses?) Another child mistook the word much for a noun, and showed her ability to use the plural /ez/ allomorph: so many muches.
soooo many muches!!
One child said at bedtime Can you cush and coze me?meaning that she wanted her mom to make her cushy and cozy. This represents an understanding of the suffix -y in adjectives. She knows that -y often means having the quality of the root word (which could be either nouns as in sandy or verbs as in runny), and so invented root word verbs cush and coze.
This next one is particularly genius, in a couple of ways. A child apparently said that when the family car got new tires, it was retired. This shows an understanding of the prefix re-, meaning to do something again (to again put tires on a car). Then, adding -ed in this case changes the word from a noun to an adjective, called a participial adjective (as in I am bored). Also, we know that retired is a word that actually does exist, although it means something completely different. Likely this child heard that word at one point, and used his smarts about morphology to infer a possible meaning. Genius!
Here’s a neat one: a child used willn’tinstead of won’t, apparently having analyzed all the other n’t contractions and determining that they should closely resemble the words from which they are derived (as in do-don’t, can-can’t, should-shouldn’t). So of course the opposite of will is willn’t. I’d like to see how many grown-ups have thought of that. Not me, to be honest, and I think about a lot of stuff like this. Thanks, kiddo, for pointing me towards this explanation.
Another little girl apparently used peace-ifyin the place of pacify, I’m guessing in the context of talking about a baby’s pacifier bringing about a moment of peace. That parent basically has a mini etymologist on her hands, because this kid probably already knows that both peace and pacify come from the Latin word pax, and the suffix -ify changes a word to a verb that means to become the root word.
Similar to the cush and coze example, this one involves the child removing a part of a word. Hammers are what you use the ham things. The -er suffix changes a word from an action to a thing that does the action. Workers work. Players play. Hammers ham. Of course!
I want so badly for this next one to be correct: the child who thought that the opposite of nocturnal was turnal. It’s brilliant, because a) the kid already knows the word nocturnal b) it still shows awareness that words can break into parts, and c) noc sounds like not, so it’s a pretty reasonable guess! Alas, in this case, noct comes from the Latin nox for night. (The opposite of nocturnal is diurnal, which I’m not sure I’ve ever heard in my life.)
Threeth. Not a word, but the kid who said it gets that the suffix -th is used to express the ordinal numbers such as fourth, twentieth, and billionth (but not first, second, third).
Some kids were able to show understanding of morphemes for negation: dis-,un-, and de-. One wanted to be disbored(bored of being bored?), another who wanted his friend to beunsick so they could play, and another who said he would never delove his mother (I’m not crying, you’re crying!!).
These next ones involve little phrases. English has many two-word verbs, such as shut down, figure out, fit in, that are often idiomatic phrases (and notoriously difficult for English second-language speakers). A few parents shared examples that demonstrate that the child knows that grammatically there is such thing as a two-word verb, but hasn’t quite gotten it right: pick me down, buckle me out, and tuck me up(ok, that last one is my own son).
Next, some examples from bilingual or multilingual households, where kids sometimes mix vocabulary and grammar from more than one language in the same phrase. For example, a little girl who said lumes to mean that something lit up. This is a sweet mash-up of French luminer and English -s third person singular. She also used unlâcheto tell someone let go of something. This shows that she likely knows the un- English morpheme for negation, but lâche in French already means let go.
Another bilingual child was mad because her brother retruiredher castle. The child combined re-, détruir (destroy), and the English past tense -ed. Seems like someone wrecked that castle a few times over.
And finally, because no story about preschoolers in complete without reference to poop and/or boogers: microttes. This one is a portmanteau, or a word coined by blending two words, such as breakfast + lunch = brunch. A child from a trilingual French-Spanish-English house apparently regularly invented her own words and one day came up with microttes as a combination of microbes (germs) and crottes (boogers/little poops). Great! And gross, so let’s go wash our hands, shall we?
Are you curious about the age at which children typically acquire grammatical morphemes? Although we have a pretty clear picture of the sequence of development of early grammar, the age of acquisition varies a lot from child to child. This chart can give a general idea, though a word of caution: age estimates are based on observations of a rather small number of children.
Grammatical morpheme
Examples
Common age of acquisition
Present progressive ing
Prepositions on, in
Regular plural
Eating.
On the table. In the car.
Dogs, cats
27-30 months
Irregular past tense
Possessive ‘s
Uncontractible copula
It fell.
Mommy’s coffee
Is it here? It is!
31-34 months
Articles a, the
Regular past tense
3rd person singular -s
A flower. The car.
I licked my ice cream.
He likes pizza.
35-40 months
3rd person of have, do
Forms of the verb be
He has a dog. She does yoga.
He is climbing. I’m not sliding, but she is. Are you hungry?
This post has been about children’s development of spoken grammar. Some children need extra help with this, but, as previously mentioned, children learn spoken language mostly by simply talking with others. Little kids don’t need to worry about understanding how grammar works in spoken language, because they unconsciously learn the rules. However, we know that learning written language is not the same process. In order to efficiently acquire literacy skills, school-aged children benefit from explicit teaching of many aspects grammar. For example, many young children will write stopped as stopt and hugged as hugd. When we teach kids that the letters ed at the end of a word represent the regular past tense, we are teaching morphological awareness. This helps developing readers decode, understand, and spell complex words such as impossible, cooperation, mismanagement, unfathomable. But morphological awareness is a huge topic for another day. Willn’t you stay tuned??
Anchor Chart: it’s a phrase used commonly in education.
They adorn walls in classrooms across the country, and, when used correctly, they can be an excellent instructional tool.
But sometimes the phrase “anchor chart” is used to refer to something that isn’t an anchor chart at all. It’s a poster.
So what’s the difference?
Let’s start with anchor charts. There are a few things that make them special:
Anchor charts are…
made DURING the lesson.
records of student and teacher thinking.
an anchor (ahhhh) for student learning.
placed on the wall to help students recall the lesson experience and content.
replaced when they are no longer needed or useful to students.
interactive. They can be added to over time.
full of student and teacher handwriting.
purposeful.
Anchor charts are not…
printed out from a file or teacher-created and possibly laminated.
done BEFORE the lesson.
records of teacher thinking or information only.
static; remaining the same over time.
wallpaper in the classroom.
the same year after year.
decorations.
Those are posters.
So let’s talk a little bit about how to use anchor charts effectively.
Tip #1: Use them purposefully.
Anchor charts come into play when there’s an important concept and learning experience that you want kids to recall. You may be a planner: you may know in advance that you plan to use an anchor chart to record and think through the lesson with kids. But you might not. You may be suddenly inspired during a lesson, whip out a blank chart paper, and go to town! Either way is ok!
That being said, you probably don’t want an anchor chart for every single lesson. It’s overwhelming and cluttered. You may want to identify the main concepts you want kids to have a reference for and build charts in those situations. As charts become outdated or unnecessary, take them down so you can replace them with current ones.
You can save the old charts, if you think kids will need to refer to them later. You can also just stack new charts on top of the old chart, by stapling only across the top.
Tip #2: Do some thinking first.
Some people have a template for the anchor chart before they begin the lesson. Having a general idea of structure and organization for your chart is a good thing, but you don’t need (or even want) to have every last detail planned out. If you already know what you’re going to write on the chart, you’re less likely to allow for kid input.
It definitely helps to have kid-friendly definitions or language ready so you’re not fumbling for how to word certain things on your chart. Ideally, you’ll probably have this as part of your lesson planning anyway.
Tip #3 Include a learning target.
I try to include a learning target, purpose, or title on the chart. This helps kids recall what the point of the lesson was. I also will try to include the concept information (main bullet points of important ideas) needed for kids to recall the lesson later.
Tip #4 Try it out!
Then, we try the strategy out in the way that I want kids to try it later. We might use sentence starters, post-it responses, task cards, or a graphic organizer to help kids try out the strategy, and record it on the chart.
Tip #5 Don’t stress about beautiful-ness!
I keep it all-natural 🙂 I record as we go through the lesson. I try to use color well, but honestly, I usually forget. My charts are not beautiful or gorgeous. You can definitely see a difference between the charts I make as a sample and the charts I make in the moment in the classroom. And that’s ok! If they’re legible and they’re purposeful, and kids can access the information on them, they’re fine!
Some teachers take home charts after the fact to rewrite them. The issue with this is that, at that point, it no longer looks like the chart you made with your students during the lesson. It’s invariably organized differently or has information in different places. Will kids still refer back to it, or will it become wallpaper?
The main purpose of an anchor chart is to be a useful record for student reference. It anchors student learning to the chart. Posters, while they may be attractive and perfectly designed, are not anchor charts. They serve a completely different purpose.
Do you have any great tips for using anchor charts?
Save
More Example:
If you’ve read my previous post about anchor charts, you know that I feel pretty strongly about a few things.
They must be created with kids, during a lesson, and they shouldn’t just be wallpaper in the classroom.
Instead, we want charts that grow and can be added to as kids learn and try new things.
The best way to ensure that anchor charts don’t become wallpaper is to make them interactive. If kids can interact with charts, they are more likely to learn the content and strategies that the chart represents.
Also, having their own handwriting on a chart, or their own work, can give them ownership over that learning.
And the more times we refer to a previous “anchor” lesson, the more it will solidify in kids’ brains.
So here are a few ways to do just that!
#1 Post-it try-its
Have kids try out the strategy or skill you’re working on. For example, on the first chart, we recorded characteristics and important details of two different texts to help us make connections. We figured out the lesson from the first text, and I had the kids figure out the lesson of the second text on their own. They wrote it on a post-it and we charted them up!
#2 Task cards
One easy way to have kids try out a skill or strategy is through using task cards. They’re equipped with short texts and they’re made for targeting specific skills. For this anchor chart, I had kids identify evidence on task cards for author’s purpose. They marked their evidence with yellow highlighter. Then we sorted the cards by author’s purpose. This interactive lesson required kids to practice the strategy and apply it right away. Then we used their thinking as evidence for our chart! You can grab the materials for this lesson here.
This isn’t exactly a task card, but I did provide groups of kids with a paragraph that they could analyze to find evidence and make inferences about characters. Kids marked their evidence and told me what to label on the chart. They love this activity! For some reason, marking up a paragraph in large font is so much more fun than marking up a little paragraph.
In this anchor activity, groups of students matched cards with examples of sensory language, the sense the language appealed to, and the effect of the language on the reader. They underlined their evidence on each card to prove their thinking.
Then we built a three-columned chart with their cards to have an anchor to refer back to! It was a great way to help kids get started with noticing sensory details in mentor texts.
Charts that kids can add to over time make great interactive reminders of their learning. They’re also helpful for setting a purpose for independent reading! For example, you can direct students to look for examples of figurative language, or specific types of characters, and add them to the chart.
For the charts below, I introduced a strategy (identifying theme, and describing characters) and the categories or types kids might encounter. Kids were encouraged to add the titles of books as they came across them, and in other cases we added the titles of texts we read together as a class.
Adding pictures of the covers is a great way to help kids remember the book, too!
#4 Post-its on graphic organizers
Blank graphic organizers make great anchor charts because they help kids organize information visually. For this chart about plot structure in fiction, we marked the important elements on the plot map with symbols. Then we recorded important events from the stories we read on post-its. We sequenced the events on the map. For a bonus, we pulled the post-its off of the plot map to represent cause and effect in the bottom right corner. This would make a great work station, too!
#5 Record of learning
For these interactive charts inspired by Lead4ward, we broke up the space into four different areas of focus: texts we read, summary elements, making inferences, and vocabulary. Each chart represented a different genre.
As we worked through texts, we added them to the chart. Sometimes students provided their copy that they’d written their thinking on to add to the chart! We also added question types that referred to summary elements and making inferences. As we came across important academic vocabulary, kids recorded the words on post-its and stuck them on the charts. Great way to record learning and to review later!
These are some of the fun ways I’ve used anchor charts to help kids record and interact with their learning. Which idea would you try?
Have you ever watched a child attempt to take his first steps? Typically he tries, falls down, tries again, falls again, and repeats this process until he experiences success. When he does, there is usually a room full of smiling, clapping adults providing encouragement to continue on.
Occasionally, if a fall hurts, there will be tears, but often the young child is resilient and just keeps on trying. What is it about young children that pushes them to keep trying? Wouldn’t it be great if we could see that same resilience in our students as they learn to read, spell, and solve math problems?
Daily 5 and CAFE promote resilient learning through conferring, modeling, and sharing.
Conferring—When teachers confer with students, they model and provide guidance. They also give the child an opportunity to practice in small increments, similar to a child who is taking first steps.
Modeling—Daily 5 sets the stage for student success through student modeling of desired behaviors and teacher modeling during focus lessons. This modeling provides children with a picture in their minds of the desired outcome and an understanding of what it will look like, sound like, and feel like when they are independent.
Sharing—Student sharing at the end of Daily 5 provides encouragement to students to revisit their work, try something that worked for a peer, and celebrate small steps of success.
The culture and community that is fostered in a Daily 5/CAFE classroom can make it just as natural for our learners to resiliently try again and again as it is for a small child who is learning to walk.
We’ve all been there. Weeks of carefully planned lessons, and at the end of the unit, the students take the test, and the results are disappointing. How can that be? How is it possible that the students didn’t learn the content after all that teaching? It’s simple, really: They didn’t transfer their learning to long-term memory.
Thanks to advances in neuroscience and cognitive psychology, we now know a lot about how memory works. Here are the basics: First, we engage different types of memory depending on the task. Second, being able to retrieve information stored in long-term memory is an essential part of learning. Third, forgetting is a natural process. Our brains regularly sort through information when we sleep (and while we’re awake) to determine what’s important to save and what isn’t.
When it comes to instruction, it’s helpful for teachers to understand the different types of memory, when and how to engage them, and how to instruct students in such a way that they can move new information from their working memory to long-term memory.
THE TYPES OF MEMORY INVOLVED IN LEARNING
The first type of memory engaged when learning is our short-term or working memory. Working memory is temporary storage with limited capacity. Generally speaking, the younger the student, the smaller the capacity. Children who are the same age can have widely varying capacities for working memory. We see this when we ask them to pay attention and follow directions.
In the book Uncommon Sense Teaching, the writers describe working memory as a juggling octopus: “Too many balls at once, and poof, everything falls away!” So, depending on the complexity of the direction or task, it’s important to support students who have different capacities for working memory. We can do this by repeating directions, writing directions down, and supporting tasks with visuals.
The second type of memory engaged while learning is our long-term memory. It exists in the cortex and, unlike our working memory, has an unlimited storage capacity. Long-term memory is broken into two main categories: explicit and implicit. Explicit memory uses the conscious recollection of information, experiences, and concepts. Implicit memory is unconscious memory or performing activities without having to think about them, such as riding a bike. The trick is being able to retrieve the information once it’s stored.
Research on memory shows that our rote memory is very limited, and it’s easy to forget things. When presented with information in isolation or in random order, our brains have a very difficult time encoding it into our long-term memory. According to the Ebbinghaus forgetting curve, we forget a lot of what we learn over time. The more time that passes, the more we forget. This happens relatively quickly, and it’ll be lost forever unless we consciously review the information over time. So just because you taught it once doesn’t mean your students are going to remember it.
How can educators enhance students’ ability to remember? Several strategies supported by research can have a significant impact on a student’s ability to remember new learning.
RESEARCH-BACKED STRATEGIES
Activating background knowledge: Background knowledge is super-important for learning—there may already be a neural pathway in the brain for the new information to connect to and strengthen. We need to activate those connections before we begin teaching the new content or skill. Concept mapping, word webs, KWL charts, think/pair/share activities, and videos are all strategies that awaken previous knowledge and enhance the process of encoding new information.
Having strong background knowledge can actually improve our working memory. Research on schema-based learning reveals that new learning can embed more easily in the neocortex.
Using retrieval practice: If we can’t recall the information, we haven’t learned it. Students can utilize helpful retrieval practice strategies such as using flash cards, writing down a summary of the day’s learning, and reacting to the lesson by stating three main points and their importance. Try using entrance and exit tickets, giving frequent quizzes, and using programs like Kahoot and Quizlet.
Contextualizing learning: Make learning relevant and interactive. Mix up lessons so that your students don’t have to listen to you talk for more than 10 minutes at a time. They have to use their working memory, which has a very limited capacity, to follow a lecture, so stop and have them do the following:
Turn and talk to a partner
Do a demonstration
Incorporate active learning or hands-on learning intermittently
Summarize or draw a picture that encompasses the main points of the learning
Use concept mapping or story mapping strategies throughout a lesson
Using interleaved practice: Make connections. When teachers use interleaved practice, they help students make connections to different topics while learning. For example, they may be learning about a particular historical event, but you then connect it to something else that was going on at the time that was also impacted. This term also describes mixed practice, so maybe your students are revisiting addition and subtraction facts when they practice new multiplication facts. Research shows that interleaving improves retention of new information and results in faster acquisition of the information.
Learning depends on our ability to store new information in our long-term memory and our ability to retrieve that information when we need it. Understanding and applying foundational research on memory can help teachers enhance student learning by improving students’ ability to move new learning from working memory to long-term memory.
When students transfer information into long-term memory, their working memory doesn’t have to work so hard, and they are able to grapple with novel, complex topics quicker and more efficiently. Learning becomes less of a struggle, and students may feel smarter and more confident. When students feel this way, they’re more willing to stick with difficult concepts and problems—allowing them to learn deeply. Ultimately, teachers can see better learning outcomes on assessments, which makes them energized and confident too.

 As with most art, constraints improve the output: limit the number of words that students can use in a row, or set a minimum or maximum number of words.
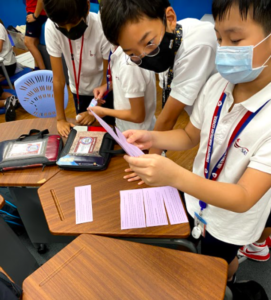 During our study of world religions, I wanted to ensure students thoughtfully read an article about the Dalai Lama. To get them talking and processing, I spaced
 Ask students to read an article or watch a video that has two perspectives; we watched the